
I'm telling you...these wreaths just get better and better. Now once again, I can not take full credit. I know, I cheat! I steal other people's ideas and run with them as fast as I can. And I am sooo glad that other people in the world are creative...so I can 'appear' creative to others as well.
So....with no further adieu, here's a Halloween wreath that is sure to spook the neighbors!

You start by getting your retired dad, who seemingly has nothing better to do than to help you once again with your 'new project', to help you gather some sticks from his yard and cut them into small pieces. Our yard might as well be a barren wasteland....no trees of any sort that can produce any useful limbs.
After you've gathered enough sticks, break out that old can of black spray paint you've been trying to figure out what to use on...and get busy. Spray spray spray. Rotate. Spray. Make sure the tips of the sticks are black too. No body is scared of a regular ol' stick...make sure these puppies are black!

While those are drying...grab two of your kitchen bowls and a piece of cardboard (diaper box, wipes box, hmm...just some examples) and trace both bowls onto the cardboard...the smaller one inside the larger one. I used about an 8.5" bowl and 6" bowl. Then cut that sucker out. This sounds easy, but is harder than you think. Cardboard is surprisingly stiff when you want to actually cut a circle out of another circle. Once you've got your 'ring'...you can either spray paint it black or what I did was wrapped it in black tape. I thought this may make my cardboard a little sturdier. It didn't really...but I had ran out of black spray paint...so this worked fine for me.
 |  |  |
 |  |
Then I started to hot glue all the now dry, black sticks (that have been taking up space in my garage for two days now) all around the black cardboard ring. This took a little maneuvering...but I got it done. It was good to have an array of fatter and thinner sticks to fill in spots. Once they were all glued on I had about 5 or 6 sticks left over...so I'd say that was good planning. Goooo me :)
I looped a piece of ribbon around the top of the wreath and went ahead and tied a bow, so that the ribbon would be in place before I attached the wooden Happy Halloween cutout.

Since the stick thicknesses were so different, my original plan of glueing the wooden cutout to the top of them...now didn't seem really feasible. I thought it wouldn't hold as well. So I got out some trusty floral wire that I had and just wrapped it around four spots on the cut out and wrapped it around the cardboard ring and twisted it secure. This seemed to work perfectly - if you don't mind seeing the itsy bitsiest piece of wire. I do mind, but hey, the glue wouldn't have worked...and I wanted this thang to stay together!
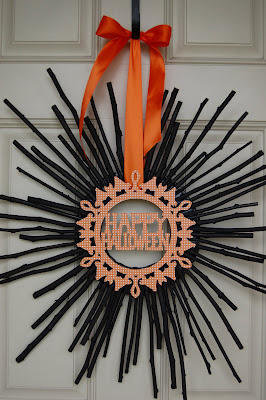
I popped that sucker on my front door (after cleaning off all the REAL cobwebs and dead spiders, yuck!) and bam...I once again out do my neighbors' halloween wreaths. Wait, they don't have up halloween wreaths, BUT...if they did...I'm just saying. This one is awesome.
Thanks to this site for the idea! ** Delia Creates **
This is Fab Sam!! You are so creative! Love it :)
ReplyDelete